Building a Visual Novel in Under 3MB

Cooped Up! is a web-based visual novel developed internally by us here at 3 Halves Games. While most visual novels are usually made with Ren'Py, we decided to roll our own solution built atop of web technologies. The end result was impressive: the entire game after bundling and zipping was under 3MB. Let's discuss how we did it.
Ren'Py VS Naninovel VS Custom Solution
From talking to the community in the VN-focused DevTalk+ server, I saw that there were two popular solutions for creating visual novels: the first is the famous Ren'Py, and the second was the Unity framework Naninovel. Both are large-scale tools that offer many essentials for longform visual novels, including:
- Build support for executables and web
- Fast-forward ability through seen dialogue
- Built-in save file handling
- Quick-saving, quick-reloading
- Multiple out-of-the-box animation solutions
None of the above exist with our custom solution. This begs the question: why go through all the effort to make a custom solution that lacks the above features deemed necessary for visual novels? Our answer was simple: the scope of our web-based visual novels are extremely tiny. We simply did not need those features to deliver our title. Our priorities were not to put out a longform game that can be played across multiple sessions, rather it was to make a tiny game played once in a single sitting. Our next largest priority was to have the game be playable through a web-browser. As it turns out, we exclusively wanted the game to be playable through a web-browser.
Due to the rationale above, I made the decision to write my own visual novel framework in JavaScript atop of npm packages. The decision was made because it would best meet our needs, not because of any moral or philosophical disgust at the concept of using a pre-built framework or engine.
As it turns out, the basis for our web-based VN solution has been used for three games now:
- What Do You Do When You Ask Four People Out and They All Say Yes?
- Din in the Seventeenth Minute
- Cooped Up!
Selecting NPM Dependencies
In a node.js environment, we have to decide between user-facing dependencies and development-only dependencies. The user-facing packages will get included in the final build of the game, whereas the dev-only ones merely assist our build pipeline. Here are the decisions we came up with:
User-Facing Dependencies
We needed an underlying engine to work with, and our decision was to use Phaser CE. We contemplated Phaser 3, but settled on CE due to the breadth of documentation available. Phaser as a project was originally started as a means to provide game support in JavaScript akin to what Flixel did for Flash games. Personally, I have worked with Flixel before quite extensively, as our first release, Animal Crackers, was originally written in ActionScript 3 atop of Flixel, prior to us porting it to HaxeFlixel for a native web release. Phaser was an easy, obvious choice, especially since Phaser CE would allow us to strip out some unwanted aspects of the engine, like physics.
Next, for at least some of the above games, we did want a way to minimally save the game so that you may return to it where you left over. This was accomplished with JS Cookie. The most recent title of ours didn't require this package.
Finally, we included Font Face Observer. This vital package allowed us to determine when the browser has finished loading fonts for the game. During our load process, we yield on this task until it is complete so as to guarantee that when we proceed into the title, we have all the fonts we need loaded and ready.
Development Dependencies
Let's gloss over this a bit. We use Babel in order to write more modern JavaScript and transpile it into an older style. This essentially allows us to write simpler code and still maintain support for older browsers. We use Husky to expose git hooks in our development pipeline so that we can write tests prior to committing and pushing code. Standard is used in conjunction with Husky to keep our code styled consistency, something that vitally improves readability. Finally, the most important package is Webpack. Webpack is what ultimately builds our game, and it's because of Webpack that we can build such a minimal title. Let's dig into this a bit further:
With Webpack, we can include a number of plugins in our build. Our plugins essentially break down as follows:
- A plugin that exists just to clean directories out. This is used when issuing new builds for sanity pre-building.
- A plugin that exports the necessary index.html file, where we can specify stylistic rules.
- A plugin that allows us to shuttle information between NPM and our client JS files.
- A plugin that allows us to copy raw data and assets from the game's development directories into the build.
- A plugin that automatically compresses PNG graphics for optimization.
- A plugin that analyzes the size of our bundle to ensure we aren't making anything too heavy.
- A plugin that uglifies our JS, mostly again for optimization purposes.
With the pipeline set up and all our packages installed, we're ready to go into actually building the game!
Client-Side JavaScript

The above represents the entry point of our game. We wait for the DOM to be loaded, then we create a new game instance. Phaser CE utilizes discrete game states, and so we break our game down into a number of smaller classes. The lifecycle is as such:
- We construct a new Phaser game object, passing in our desired width and height.
- We enter the loading state. We draw our loading bar and provide callbacks to animate it when files are loaded. XHR calls are made to our data directory to grab all our data files.
- When loading is done, we enter the title screen state. Small animations play and now we can register basic callbacks on our left and right arrow keys to advance the title.
- When the callback is made, we enter the primary game state. This state is extremely small, but it leads to bigger code with our text parser. Let's take a look at the game state in its entirety:
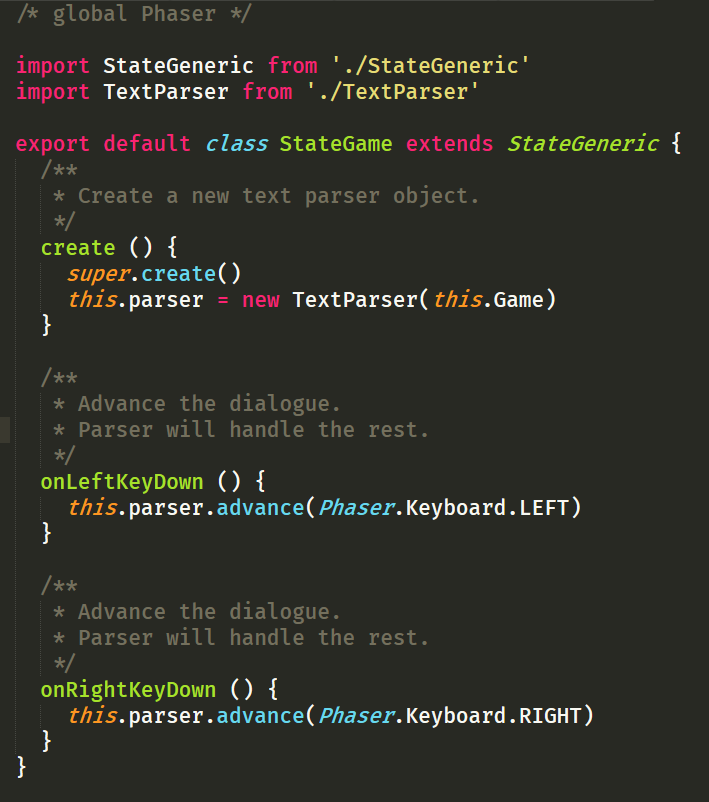
As you can see, we move into a new class, TextParser, to do the heavy lifting of reading our script. The parser loads up all the groups we need for visuals and then begins reading the primary script data file. As we parse the script, we print the lines our character-by-character. We add delays between these characters, and sometimes we delay longer if we hit a special character:
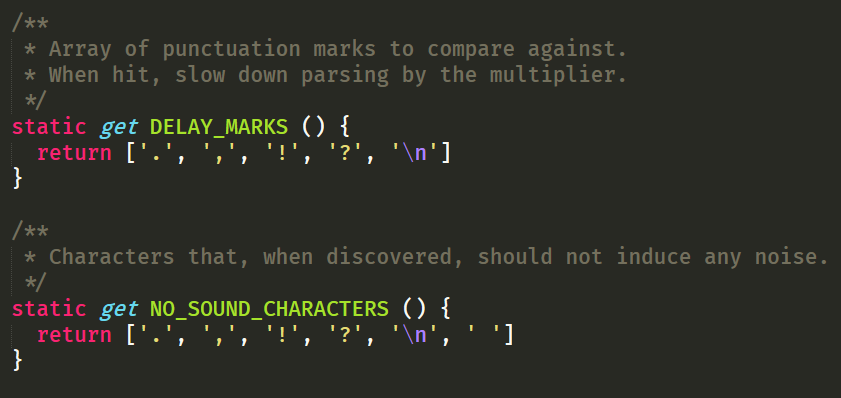
In doing this, we can get text to print out in a more realistic manner, where sounds line up better with expectations. The big important step next is to be able to handle events in the script, such as changing the character sprites, emotions, sound effects, and so on. To do this, we need to stop looking at the code and start looking at the data.
The Script File
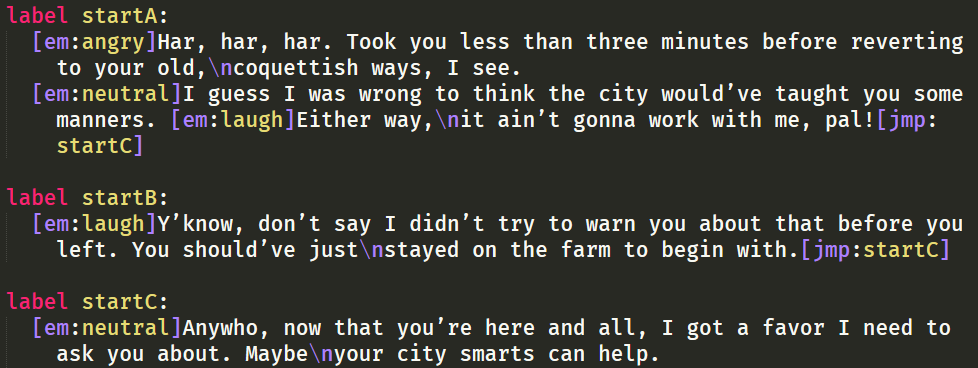
Largely inspired by Ren'Py, we have our own script file with control codes written in square brackets as you can see above. We have labels to define blocks of code, commands such as jmp to jump to a specific label, commands such as em to change the emotion of the active character, and more. The text parser when it loads the script does an initial pass on all the lines, mapping out the labels to their respective lines. Commands are parsed as they are discovered, which enable us to do things like swap emotions mid-line, add pauses in parsing mid-line with commands like p, play sound effects using s, and so on.
Is it as clean as Ren'Py? No. But is it readable and still manageable? Yes! Ultimately, that's what we were after here. We also had a custom syntax highlighter written for our unique format, one that we've abbreviated txtvn, so that we can more easily read our scripts in our text editor. The text parser mentioned before, the one that does most of the heavy lifting, simply needs a mapping of control codes to how to process them. Our control codes have parameters as you can see above, and some have multiple. This was a generic, easy way to get text parsing up and running.
Building the Game

In the above, you can see all of our game assets for Cooped Up! There aren't many here, but the important one to focus on is our assets JSON. Let's show just a sample of what it can do:
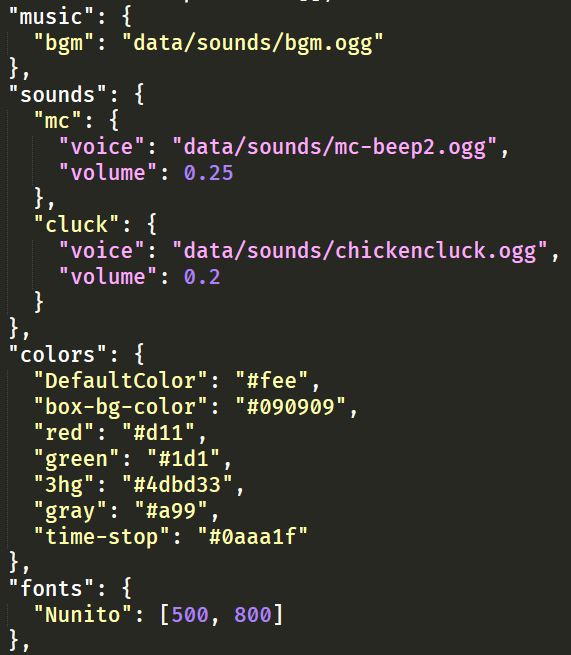
We use data to drive nearly everything in the game, from the characters we're including to the sound effects. These values then can be utilized by our script format. For example, if I want to specify the speaking SFX for the character, I can just use [sfx:mc] and it will use the mc block above in sounds to do just that. Need to play a sound effect? Let's use [s:cluck] and that's all it takes. Constant values exist here. Font style definitions exist here. Constant non-script strings also exist here. This assets JSON is the ground truth that other files like our script file rely on. Luckily, in JSON format, it is extremely easy to read and parse.
With all that, let's take a look at our game's build:
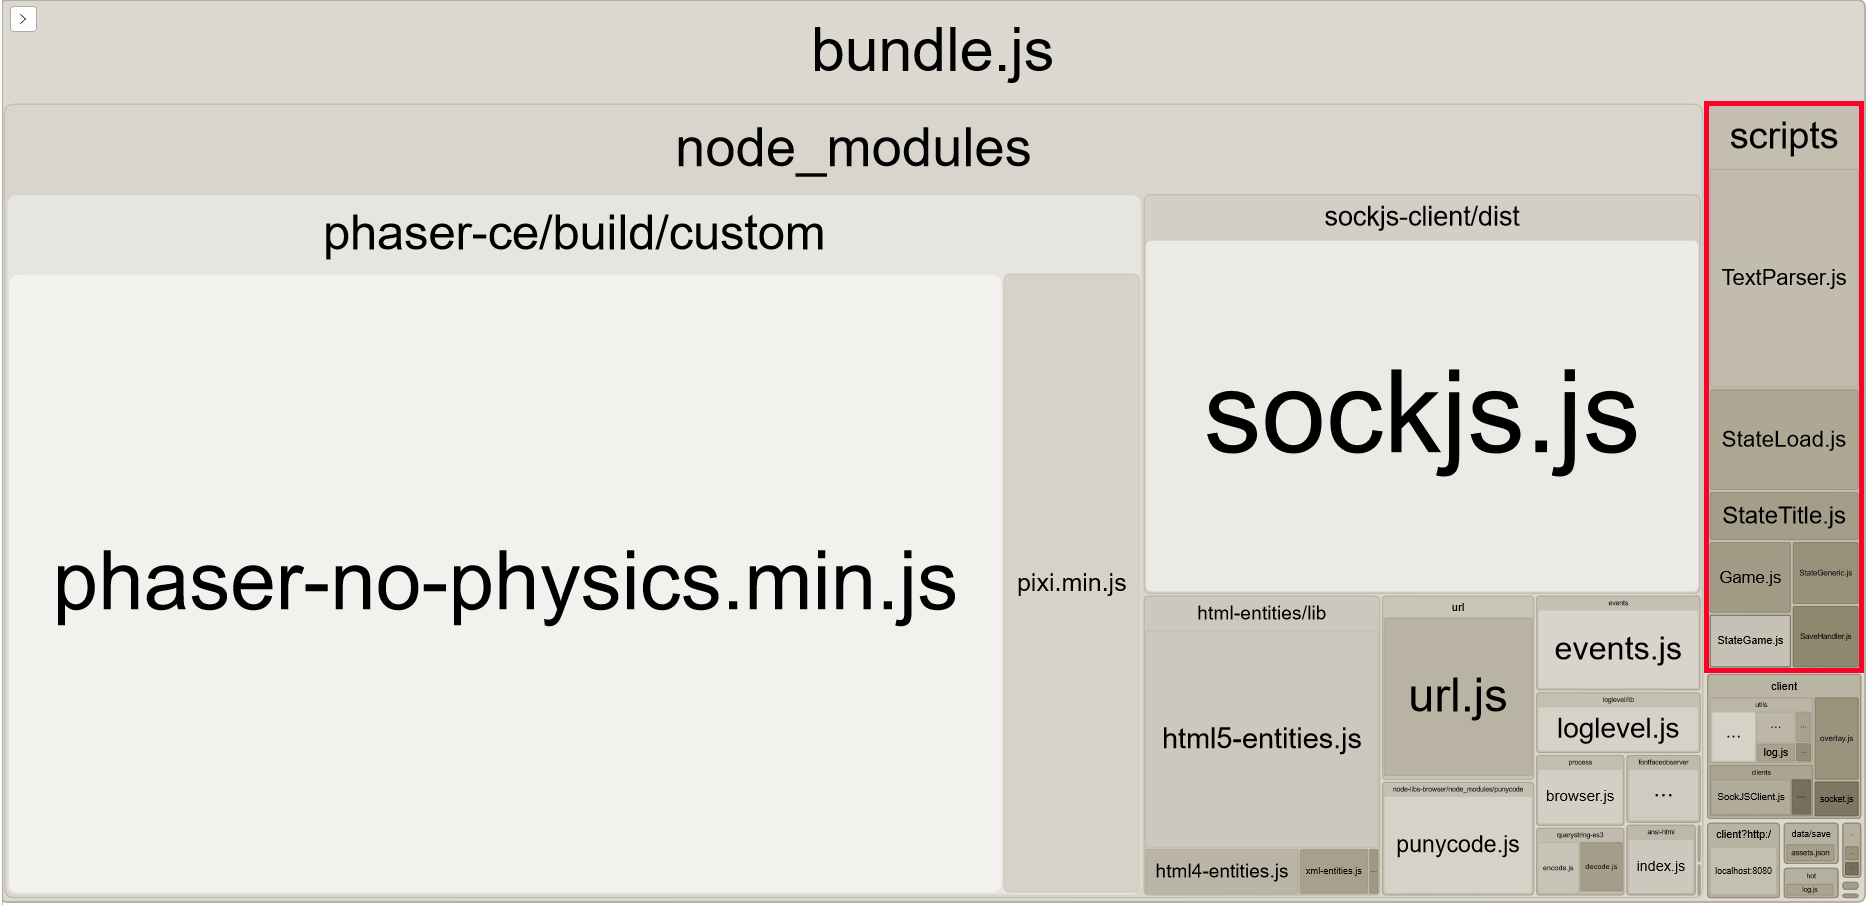
In the small red box are our scripts for the build: the rest are our dependencies. As you can see, we take a tiny portion of the overall build size with our code, with nearly all of it going to Phaser. This is exactly what we want, as we want a very minimal layer that sits atop of Phaser that can process our assets and output what we desire. Uncompressed, our final output JavaScript file, containing Phaser and our dependencies and our final game code, is only 678KB. Our index.html file is 1KB. The rest come down to our assets, uncompressed clocking it at a whopping 2.31MB. The majority of the filesize of the assets are from our sounds, representing 1.35MB of our data usage.
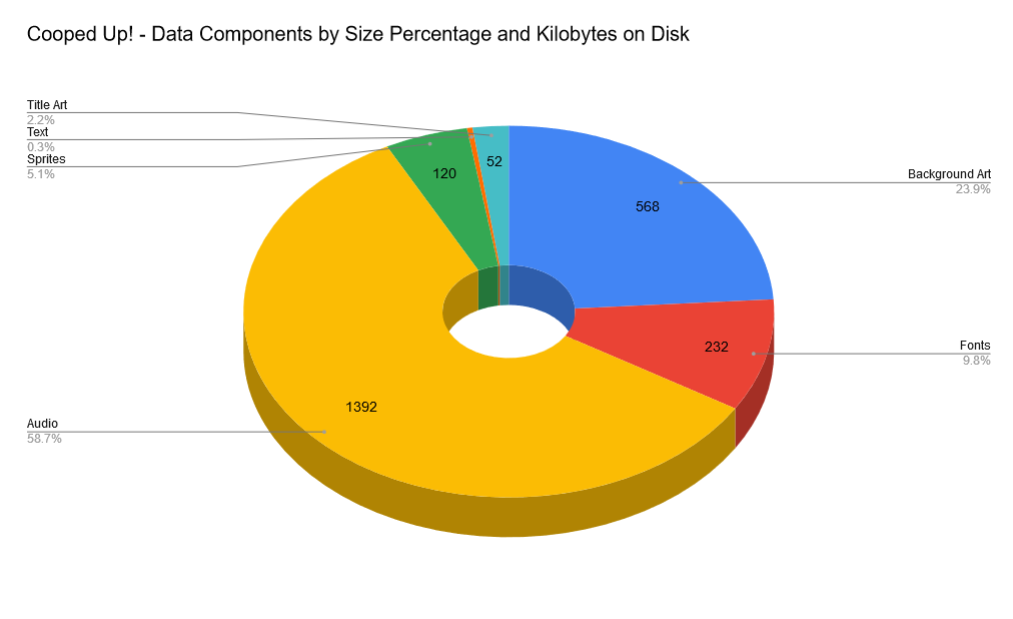
As expected, the majority is taken up by the audio files in the game. Fully compressed, the game is under 3MB and should load efficiently and quickly on any modern or modern-ish browser.
Concluding Thoughts
There is no right way to make a visual novel. We don't believe this is necessarily better than Ren'Py, and as stated previously if this were for a longer game we would not consider using our own custom solution. That said, we believed that we could engineer a framework that would work well for us and be reusable, and with the three games out that use this, all of which are under 10MB each, we believe we've proven our point well.
If you liked reading our technical ramblings above, check us out on social media!
And do consider playing our most recent short title built using the above methodology, Cooped Up!
Thanks for reading!
Cooped Up!
A farmgirl and her unamenable chickens need your help!
| Status | Released |
| Author | 3 Halves Games |
| Genre | Visual Novel |
| Tags | Chicken, Cute, Female Protagonist, Relaxing, Short, Slice Of Life |
| Languages | English |

Leave a comment
Log in with itch.io to leave a comment.